Getting started
By @lucasdicioccio, 575 words, 4 code snippets, 6 links, 0images.
expectations
At its core, KitchenSink is a static-site generator library with merely a default theme. That is, you can have multiple integration modes to run a KitchenSink-generated blog.
In this article, we browse you through the simple case where you are happy with a website that looks like this one – or at least has a similar HTML structure. As the CSS Zen Garden has demonstrated, one can do wonders with only styling. Future releases of KitchenSink may include layouts or websites that are not “showcased” on this documentation site.
pipeline
Before you get a website to entertain your readers, a number of steps are required. This guide navigates you through a subset of the complexity and assumes some familiarity with programming toolchains and workflows.
You need a few broad steps to get started:
- get KitchenSink source code
- (optional, advanced) adapt the layout or the commands
- compile KitchenSink
- write some content
- produce some HTML
- publish your website
We illustrate these steps in the following picture (which we refer as the dependency graph here):
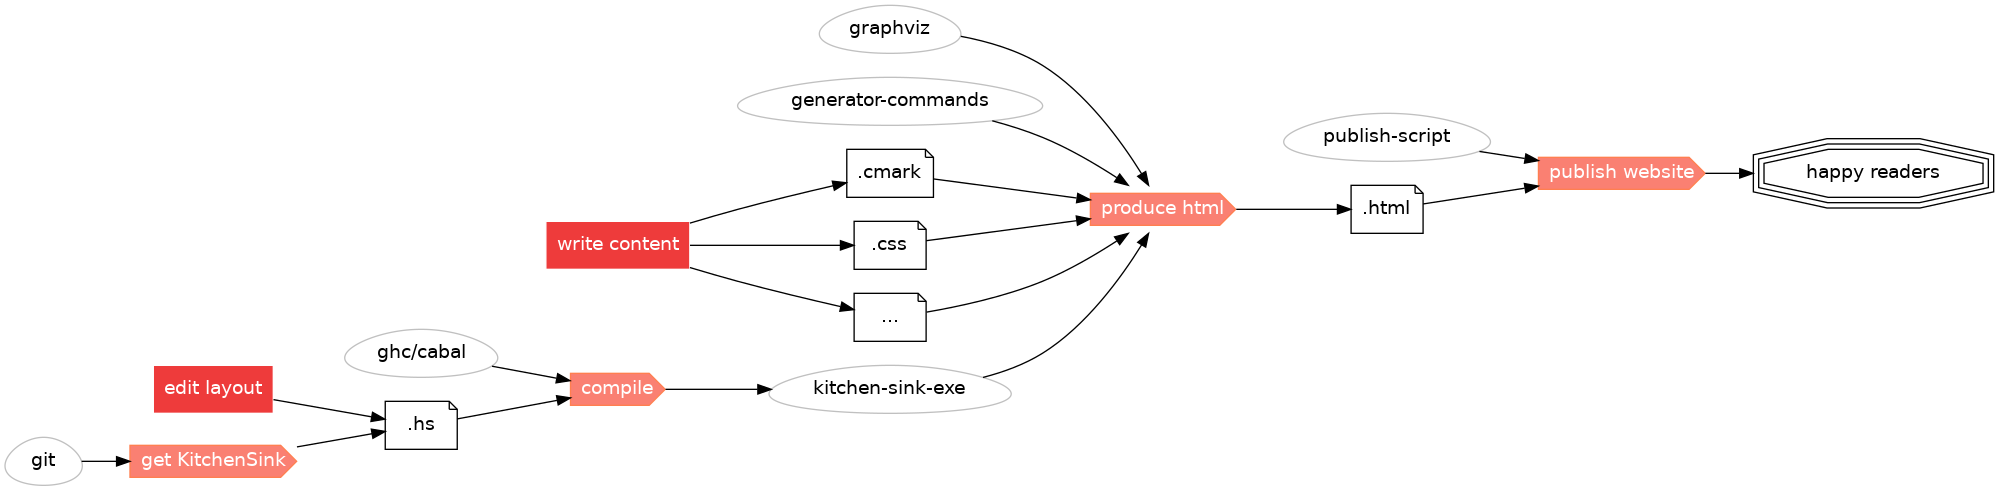
The dependency graph starts from the left with tooling and move to the right towards an HTML website making readers happy. In the above pictures “egg” shapes represent tools whereas data files use a “file” shape.
The rest of this guide covers only some subset of the whole experience. In particular, we assume that the advanced-topic of editing KitchenSink layouts is out of scope. Also, we skip the “publish website” part; you should find some help on “hosting a static website” elsewhere – at this point we believe KitchenSink is so niche that you will figure out this part. We also assume that you know how to install and run programming tools on your machine.
requirements
Requirements correspond to the “left leaves” tools in the dependency graph.
- some
gitinstallation - some Haskell installation with
cabal(tested withghc9.2.4), we recommend ghcup if you have no Haskell toolchain preference yet - (optional)
graphvizfor generating images from dot-sources - (optional) other commands you may want to use to generate contents
- (not covered) some publication script to host a directory of static-files online (e.g., GitHub pages, Netlify)
build and install from source
The goal here is to build kitchen-sink-exe in the dependency graph.
Cabal’s install directory must be in your execution PATH environment variable afterwards.
git clone https://github.com/kitchensink-tech/kitchensink.git
cd kitchensink/hs
cabal build
cabal install
minimal site setup
The goal here is to run KitchenSink in server-mode (i.e., we do not output
.html files directly as shown in the dependency graph but we edit them live).
prepare a directory structure
bash scaffolding/outputdir.sh www
bash scaffolding/sourcedir.sh site-source
start the live-edit server
kitchen-sink serve --srcDir site-source/ --outDir www/ --servMode DEV --port 7654
Then navigate to http://localhost:7654/ you’ll notice there are a few things
to tune. Things like the page title must be changed in the
kitchen-sink.json file (note: as of today when you
edit this file, you need to restart the server for all parameters to be taken
into account).
learn how to write articles
In your editor then you can add or edit new .cmark files, try adding some
“hello world” first. Then you can experiment with adding more involved
sections or various types of contents
producing html contents
Before producing some HTML contents to upload, you should modify the
kitchen-sink.json file to give some title to your
website and prepare tell the URL that will host your website once it is
uploaded.
You either run produce on the live preview (note: as of today when you edit
the kitchen-sink.json file, you need to restart the server for all parameters
to be taken into account) while running KitchenSink in serve mode.
Alternatively you separately run the following command:
kitchen-sink produce --srcDir site-source/ --outDir www/
At this point the www output dir should have the content for your website.